Mutation testing and the quest for quality
In this post you’ll learn the differences between mutation testing and code coverage by comparing several code examples and you’ll also receive practical advice on improving software quality.

The best ways to teach someone a new concept that I know of are:
- comparing the new concept with an existing one which they already know
- showing a lot of examples
In this post I’ll do both.
To understand mutation testing, let’s review what code coverage is… If we were to check the Wikipedia page (as of 01.06.2015), code coverage is defined as:
“a measure used to describe the degree to which the source code of a program is tested by a particular test suite. A program with high code coverage has been more thoroughly tested and has a lower chance of containing software bugs than a program with low code coverage.”
Unfortunately, the statements above are not very acurate. Code coverage is the degree to which the source code of a program is executed, not tested which is not the same.
You can execute the code without testing anything. In the next example you’ll see what I mean, but first let’s setup the demo project.
The Gilded Rose Kata
I’m going to use the Gilded Rose Kata as an example codebase so you can follow my explanation. This project is specifically designed so you can practice working with legacy code and it fits perfectly for learning about code coverage and mutation testing coverage. The story behind the project is that you are working for a shop and have to add support for a new item type while keeping the current behaviour (not breaking it).
You can find the project on GitHub. Read the README.markdown file for more instructions.
Code coverage
Now that you have the project let’s see how we can get the code coverage by executing the main method. While this is not the first thing someone thinks of when hearing about code coverage it will help illustrate my point.
Execute the following command:
./gradlew appCodeCoverage
This will run the main method and collect code coverage using the JaCoCo Gradle plugin. After the command finishes you should check the build/reports/jacoco/applicationCodeCoverageReport/html/index.html file to read the coverage report.
This is the project level code coverage. In the first column you can see the packages and in the next 2 columns you can see the line coverage which is also called statement coverage and it means the percent of lines that were executed from the total. The following 2 columns (columns 4 and 5) show the branch coverage which means the percent of conditional branches (if, for, while) that were executed from the total.

The branch coverage is usually lower than the statement coverage. For example, in an if statement you can execute just one branch and have 100% statement coverage, but you only have 50% branch coverage because you executed just a single branch, not both. You can see in the image above that we have 76% branch coverage versus 81% statement coverage.
In the next view (which you get by clicking on the package name) you can see the code coverage distribution for all classes in the package. For this specific project we are interested only in the GildedRose class.

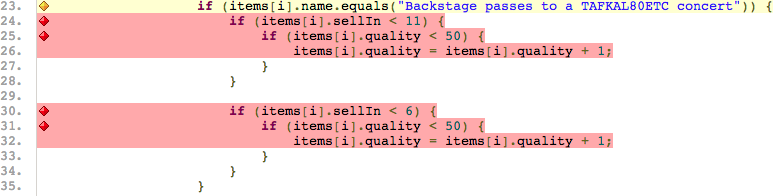
By clicking on the GildedRose class and then one of the methods you get to the code level view where you can see each line with a different background based on the executed status:

- green line - was executed
- red line - was not executed
- yellow line - only one branch of the conditional statement was executed
Partial test coverage
There is another way to obtain code coverage: by running the automated tests, which is the most widely accepted definition.
I prefer to call it test coverage instead of merely code coverage just to highlight the way they have been obtained. The code coverage is obtained by running the main method (see previous example) and test coverage by running the automated tests.
You can git checkout incomplete_tests, run ./gradlew jacoco and open the report available in the build/reports/jacoco/test/html/index.html file.
In the test coverage report you will see that the code dealing with backstage passes is not executed at all from the tests. The reason for that is simple: there are no tests for it.
The test coverage is a pretty good way for you to find out (at least in the beginning) what new tests to write, but as you’ll see in the next examples it has certain limitations.
Full test coverage?!
Now, let’s improve that test coverage we have. I mean if we get to 100% test coverage that means the code is fully tested, right? Wrong… and you’ll see why by checking out the tests_without_asserts branch. If you execute again the command to gather test coverage: ./gradlew jacoco you’ll see that the coverage jumped to 100% (for the GildedRose class which contains the logic we want to test).

Unfortunately, if you check the test code you’ll see that all the asserts are commented out… Obviously, this is just to demonstrate the test coverage weaknesses and I’m sure none of you have seen such things in The Real World.
The most likely case is that you are missing some asserts in your test code, but it is hard to see which ones because you already have high test coverage as demonstrated in this example - 100% test coverage even without asserts.
Is the code actually tested?
We saw that having high test coverage doesn’t mean anything else that the code was executed. But, you may ask, how can we actually ensure that the code is tested now that we can’t trust the test coverage?!
Well, there’s an easy answer for that: the tests you have should fail if the production code is broken…
Oh, yeah, you couldn’t state something more obvious you say…

Knowing that, you could try breaking the production code and running the tests. If the tests fail, then the code is tested. If the tests still pass then obviously they aren’t any good since they should act as your safety net in case you break something.
This is all about increasing the confidence in your tests and ensuring that you won’t fall right through your “test” safety net.
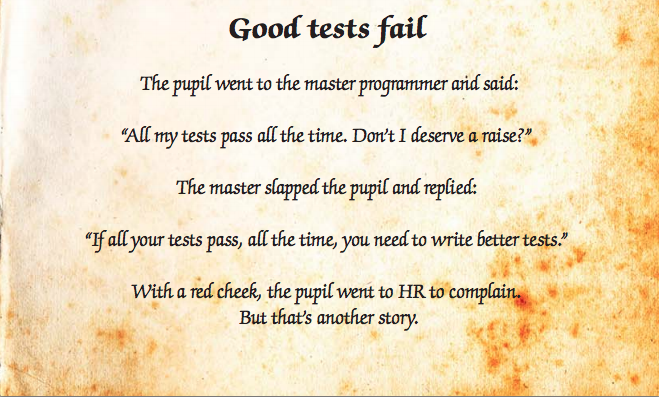
Here’s a nice story that illustrates it from The Way of Testivus by Alberto Savoia (you should check the other stories as well - they contain a lot of wisdom):
How to break the production code?
Following the previous advice, let’s see how we can break the code to highlight the problems in our tests…
If we try deleting random parts of the code we could break the code in such a way that it doesn’t compile anymore and obviously we wouldn’t be able to run the tests in that case. Clearly this is not what we want. So while we break the code we must ensure that the code still compiles.

If we try deleting a lot of code at once (keeping the code compilable) then it’s very likely that all (or almost all) the tests will fail. We don’t want that… What we want instead is to find the minimum things to break in the production code so that the tests will all pass.
The best approach is to emulate a programmers usual mistakes: off by one errors, edge cases, removing calls to functions (programmer forgot to call it), exceptions, negating boolean expressions, replacing addition with subtraction and the other way around. These are all subtle changes and it’s very likely you will discover that for some of these your tests still pass. Obviously you have to add a unit test that detects that issue.
Mutation testing concepts
We finally got to the mutation testing part which is the easiest to understand. You have to know these three concepts:
- a mutant is created by making (manually or automatically) a small change in the production code
- the mutant is killed means that your tests fail when run after creating the mutant
- the mutant survived means that your tests still pass when run after creating the mutant
To ensure the production code is fully tested your tests must kill all the mutants.
Manual mutation testing
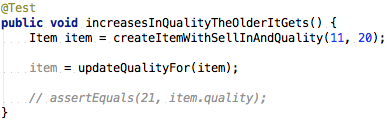
Let’s take an example and do it manually just so we understand better the process. Checkout the almost_complete_tests branch. Now we have almost all the tests and 100% test coverage. Let’s see which tests are missing.
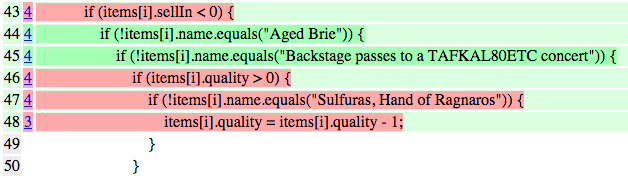
If we try changing something small (creating our mutant), like a subtraction to an addition:

and we run the unit tests again, we’ll see that they fail… this means the tests killed the mutant.
If we try doing the following change and running all the tests:

we’ll see that they pass… the mutant survived. This is a bad thing - it means that we are missing some tests…
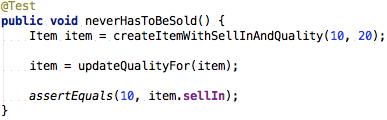
Let’s check again the requirements for Sulfuras (you can find them in the README.markdown file):
Sulfuras, being a legendary item, never has to be sold or decreases in quality
Well, now we can write a test for this requirement:
and sure enough, when running the tests again for the previous mutant we can see that they fail:

Automated mutation testing
While creating these mutants for one or two lines of code is trivial, we wouldn’t want to do it manually for a whole class or for the whole code base. Fortunately, there are solutions for that - plugins and automated tools that can create the mutants, run the tests automatically and show you a coverage report - that is a mutation test coverage report - which gives you a lot more confidence in your tests.
I set up everything so you can get the true coverage by running ./gradlew pitest and opening the build/reports/pitest/index.html file.
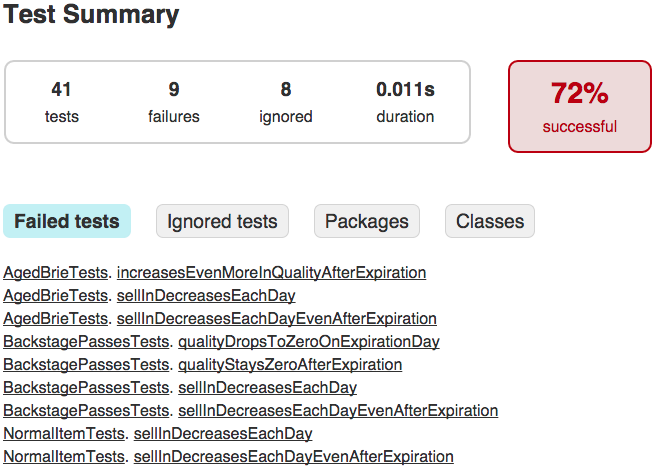
Now you will see what parts of the code are not actually tested (even though we have 100% test coverage):
I will leave writing the missing tests as an exercise. If you want to check your answers you can look in the with_tests branch which contains the complete tests that lead to 100% mutation test coverage - the highest coverage you can get.
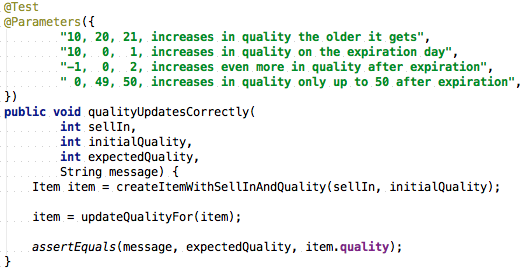
The parameterized_tests branch has the same tests as the with_tests branch except that I have removed (almost) all the duplicate code - the tests were looking very similar so I used the JUnitParams library to parameterize a single method:
Mutation testing - not a silver bullet
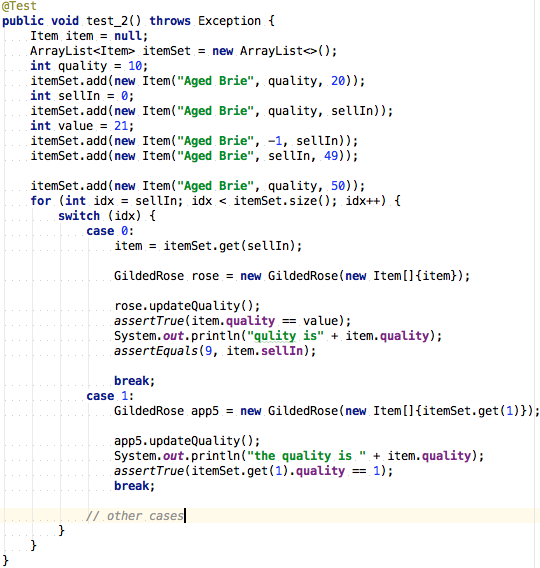
Sure, now you achieved 100% mutation test coverage and you’re absolutely sure that the tests will protect you from breaking the code. But will they also help you and not hinder the development by slowing you down?

Let’s see an example of how we could have written the tests by checking out the messed_up_tests branch. If you run again ./gradlew pitest and check the mutation test coverage you’ll see that we have 100% coverage, but something tells me you wouldn’t want to maintain those tests (which I wrote just as a proof of concept):
The Pyramid of Software Quality
I have discovered that the software quality, as the end user sees it, is highly influenced by a set of factors which I arranged into a pyramid of software quality:
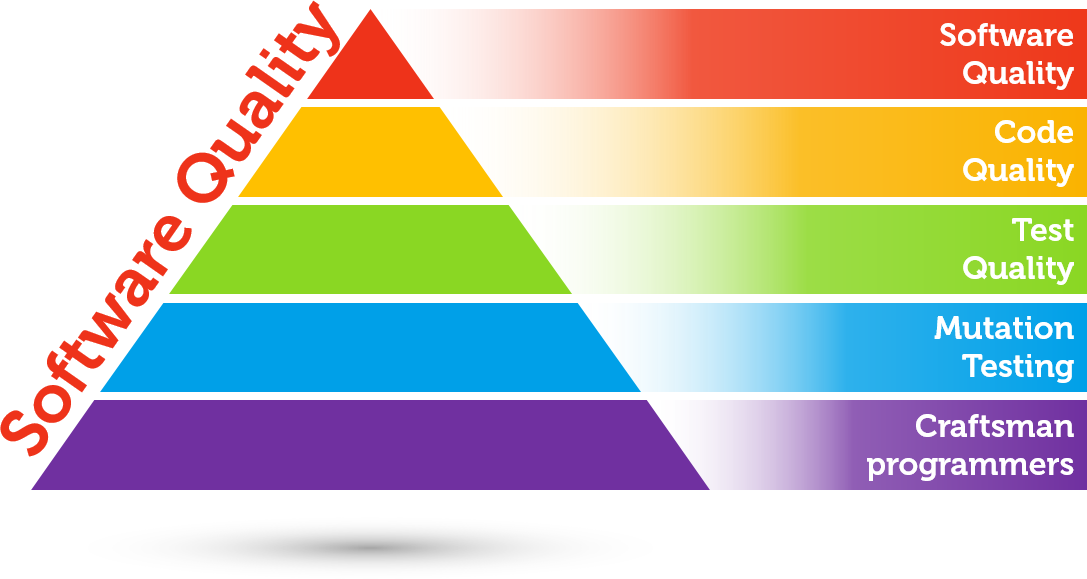
Code quality influences software quality
If the code is not maintainable then every change you make will break something else in the codebase. No change will be trivial. Every addition or modification to the code will require all the tangles, twists, and knots to be “understood”.
The logic should be straightforward to make it hard for bugs to hide. C.A.R. Hoare put it best, although it applies to everything, not just software design:
“There are two ways of constructing a software design. One way is to make it so simple that there are obviously no deficiencies. And the other way is to make it so complicated that there are no obvious deficiencies.”
Test quality influences code quality
If you want to keep the code quality high then you have to refactor often and you can’t do it if you don’t have tests or if they don’t cover the code you’re interested in.
Mutation testing influences test quality
To have confidence that your tests will keep you from breaking the production code you need to have a high mutation test coverage. If you note, in this pyramid, I didn’t include “normal” test coverage because mutation test coverage is a stronger/better version of it.
Craftsman programmers influence everything
Finally, craftsman programmers influence every aspect of software development: they increase software quality by improving both: the production code and the test code. It doesn’t matter if you have high mutation test coverage if you have flickering tests and/or they are unreadable and have a high maintenance cost.
Michael Feathers put it best in this quote from the “Clean code” book by Robert C. Martin:
I could list all of the qualities that I notice in clean code, but there is one overarching quality that leads to all of them. Clean code always looks like it was written by someone who cares.
Mutation testing and performance
Mutation testing tools like pitest have to run the automated tests for each mutant they produce. This means that it will take quite a lot of time to run them compared to simply running the tests. Of course, good tools don’t run all the tests. They perform optimizations like running only the tests that execute the changed code based on the (normal) test coverage. This is very helpful and improves the performance quite a bit.
However, there are still things that you can do to get the mutation test coverage faster. One of these is to write true unit tests like Michael Feathers defines them:
A test is not a unit test if:
- It talks to the database
- It communicates across the network
- It touches the file system
- It can’t run at the same time as any of your other unit tests
- You have to do special things to your environment (such as editing config files) to run it.
Another thing you can do is to make the tool gather the coverage just for the module you’re currently working on and to also limit the mutators used. In pitest you can do this by specifying the targetClasses, targetTests and the mutators in the build.gradle script:
group = 'com.gildedrose'
// ...
pitest {
    targetClasses = ["${project.group}.GildedRose"]
    targetTests = ["${project.group}.AllTests"]
    mutators = ["ALL"]
}
Coverage and quality targets
Don’t transform coverage (of any type: being it normal or mutation test coverage) into a target if you don’t want programmers to cheat it by writing the worst tests possible that will hinder the maintenance/development more than anything else. I showed you an example in the messed_up_tests branch how bad can the tests be.

The only purpose any coverage has is to help you find untested code and to reduce risks when improving the codebase.
Mutation testing tools
For some languages the tools aren’t that well developed. The highest quality tools seem (haven’t tried all of them) to be for java, ruby and php. The .NET and python tools are quite limited.
Other languages (like C/C++) don’t have any tools but this doesn’t mean you can’t write tests and before refactoring try them out by changing manually some lines and checking if the tests fail. That’s the least you can do in that case.
For java there is pitest. There are others as well, but pitest seems the best considering the integration with build tools.
For ruby you have Heckle and Mutant.
For php you can use Humbug.
For .NET the tools are seriously limited so don’t be dissapointed:
For python there’s Pester. Don’t be surprised you see Java and JUnit - if you continue reading the page you’ll see links for pester too. Another (not very mature) tool for Python is elcap.